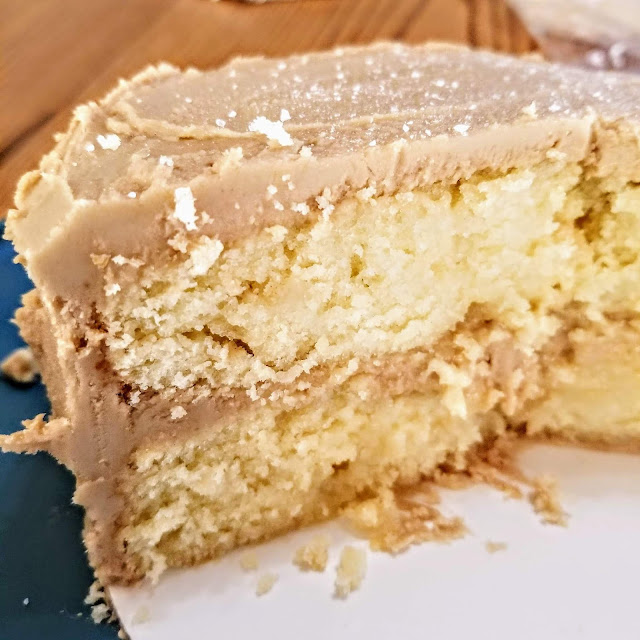
Sea Salted Caramel Cake
Cake scares me. It should scare you too. Is there any food capable of more extravagance and difficulty? Is there another food that requires such a plethora of skills and artistry? On the one hand, if you do it right, even an elegantly-simple cake can have such depth of complex flavor that anyone who tastes it will experience near euphoria. On the other, you end up on cakewrecks.com and everyone takes one bite before feigning strict adherence to a diet.
Know what else scares me? Caramel. It's just sugar and dairy, but making it means slowly burning molten-lava sugar just enough before stirring in ice-cold cream and hoping it doesn't explode, sending you to the burn ward in the I.C.U. It's either delicious and creamy and perfect or you throw out your pot and have to install air scrubbers to get the burned-sugar smell out of your kitchen. No middle ground.
So, what better way to punish ourselves in the pursuit of palate perfection than by combining the two? Today we're making:
Sea-Salted Caramel Cake.
That's right. 2-3 layers of incredible deliciousness, topped with just enough salt to tickle your tonsils. The frosting is rich and flavorful, the cake is moist without being dense, and the presentation is simple yet stunning.
First, the cakes.
Ingredients:
- 2 1/2 cups All-Purpose Flour
- 1/2 tsp Salt
- 1/2 tsp Baking Soda
- 1 cup salted butter, soft but not melty
- 1 1/2 cups buttermilk
- 3 Eggs
- 2 cups Sugar
- 1 Tbsp Vanilla
Method:
Preheat oven to 350 F. Start with the dry. Combine the flour, salt, and baking soda and whisk the mixture uniform. Set this aside for a bit. Have the buttermilk measured and nearby as well. Then make the wet. Start by creaming the butter by beating it half to death (as in medium speed) in a stand mixer while slowly adding the sugar. This does 2 things-- makes sure the butter distributes evenly throughout the cake and adds air, which helps the cake to rise properly. Then the eggs go in one at a time, keep the mixer going on medium until everything is uniform.
Now, the important part. We want to alternate mixing in dry with mixing in buttermilk, beating the mixture on low speed. How much of each? Some. Look to alternate 3-4 times, letting everything blend in between-- and be sure to start and end with the flour mix. I went flour-milk-flour-milk-flour-- but if you want to go more times than that, you do you.
Once everything is mixed, gently stir in the vanilla.
You want to make sure your pans are well-greased and floured. I even did parchment on the bottom. I made four 6" rounds for two small-ish cakes, but you could do three 8" rounds or two 10" rounds. Adjust the time accordingly. My small cakes were done in about 17 minutes, the 8" prolly would take 20-22 ish, and more for the bigger ones. The important thing is to watch them, and when a wooden pick comes out clean it's time to take them out and let them cool completely on wire racks.
Time for frosting.
Ingredients:
- 1 cup Dark Brown Sugar
- 1 cup Light Brown Sugar
- 1 cup Unsalted Butter
- 1/2 cup Heavy Cream
- 4 ish cups Powdered Sugar
- 1/2 tsp Salt
- 2 tsp Vanilla
- Fresh Ground or Flaky Sea Salt
Method:
We need to get real caramel flavor without actually making the candy-- so we're going to make a type of caramel sauce, and then turn it into frosting. First, melt your butter over medium heat in a decent size saucepan. As soon as it's melted (not bubbly or cooking, just liquid), add both brown sugars. Bring the whole mix to a boil, whisking constantly. Watch it. You want to get a bit of color and caramel flavor, but no scorching or burning. Once you've achieved "a bit" of color, whisk in the cream, and bring the whole thing back to a boil. It's should look very much like caramel.
At this point, take it off the heat and put it in your stand mixer-- be sure the bowl is heatproof. Add vanilla and salt and beat on medium, slowly adding the 4ish cups of powdered sugar. Keep beating it until it gets thick and spreadable-- about 5 minutes. If you go too far, it will get very hard to spread, but you can save it by adding a few tablespoons of hot water as needed. You're looking for a thick, creamy frosting.
Time to assemble.
Method:
Let's talk equipment. Multi-tiered cakes need one of these:
This is a cake leveler. What you do with this is cut off the top of your cake layers so they are flat. This means even layers of frosting between layers and a clean appearance of the finished product. Since cake is as much about what you see as it is about what you taste... get one. Cut the top off your bottom layer, leave your top layer nice and rounded.
Add an even layer of frosting between your layers, stacking them neatly. Then frost the outside, then the top in long, even swirls. If your frosting is too thick, go back and add hot water to make it spreadable again. You're looking for a fairly thick layer of frosting all around, and you can use the frosting to cover any imperfections in the cake. A rotating cake stand also helps, if you're like me and completely lack skill with a frosting knife.
Finally, top with a light dusting of ground or flaky sea salt. Don't use table salt, but Kosher salt can work in a pinch. Serve small slices and stay away from extras; this cake is too rich for big portions or toppings.


Comments
Post a Comment